(This article was first emailed on June 28th, 2021 to fans who had registered an interest in finding out more about our Tricorder.)
We’re an hour into the Zoom call and we are still discussing the second strap sample that we have received. Little details matter to us as designers, product developers, and of course fans. The issue, of course, is that each of us has a different idea of which specific details are the important ones; which are just the nice-to-haves and which are the must-haves. Apart from our desire to get it right, the discussion is also driven by the knowledge that this process will be repeated hundreds, if not thousands, of times by fans that choose to own one of our tricorders. Eventually, we reach a consensus. There is no aspect of the development that isn’t treated this way. Some discussions take longer – much longer, and virtually no tricorder development discussion is ever significantly shorter. Here are a handful of the decisions that we have made in order to make our tricorder as good as we can make it.
The strap
Judging by the screencaps, it is clear that there were a number of different straps used for the various tricorders that appeared on the show. Depending on which tricorder was in shot at the time, and in which season it was being filmed, there were clearly a mixture of materials and finishes used at different times.
Different straps at different times actually gives us some flexibility to make a very nice strap.
When there are different instances of part of a prop and thus it’s not clear exactly what we are meant to be replicating, in some ways it’s easier because we can decide how we would like to do it, but in other ways more difficult because we then have to decide how we think it should be done. That can feel like a big responsibility.
We’re not sure of the provenance of the strap currently fitted to the tricorder we studied in Los Angeles. What we can say, though, is that that particular strap was 19 mm wide, about 1.5 mm thick, and had a visible length of 1350 mm. It was stitched along both edges and was folded over but otherwise unfinished, so it had one neat edge and one raw edge which showed the back of the leatherette.
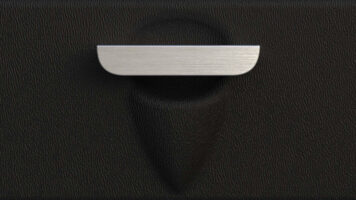
Our leatherette strap matches the critical dimensions quite closely at 1350 x 19 mm but is a little bit thicker at 2.4 mm. It has stitching down both sides, but for neatness is finished on both edges. The stiffness of the strap is also important. In use it must, of course, be strong and securely fixed to the tricorder, but for display it must be flexible and able to drape in an attractive way. Floppiness is not a property that is easily quantified, but in our discussions we have all agreed that this is a critical detail that we need to get right. It took a while to get something that we were all happy with, and after the third round of samples we had a strap with the right combination of qualities.

Our tricorder leatherette strap, 1350 mm visible length, stitched and neatly finished on both edges.
Finally, thinking about the strap takes us past its manufacture, beyond how it is securely attached to the tricorder, and on to how it will be packed and thus how the consumer will receive it. To ensure that the strap is not creased by being folded up in the packaging, the merchandising box support tray geometry has been designed to allow the strap to be packed neatly without having to fold it or bend it too tightly. Once we have production samples, transit testing will confirm the integrity and function of the pack to perform as intended. Some detail modification to the internal layout of the packaging may still be needed.

The paper pulp tray is designed to hold the tricorder securely and provide enough space for the strap to nestle without being folded so that it doesn’t crease.
Surface detail
The first two screen-used tricorder props were made by thermoforming a leather-patterned plastic sheet material called Kydex. In mass production of injection-moulded parts, typically, where special finishes are needed, textures are created inside the tool by an acid etching process. At the texture feature level, the result is essentially a 2D pattern projected onto the surface of the product which, with the texture’s flat top and angled sides, cannot fully replicate Kydex’s complex 3D dimple features. Where more rounded micro features in the texture are required, the pattern must be laser etched into the tool. For the tricorder we will be using the same process and supplier that provided the texture for our Star Trek communicator. However, despite being an excellent pattern match for the Kydex, as the communicator texture was too deep at 150 µm deep, we will be making the tricorder texture shallower.
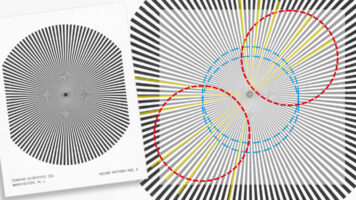
For the tricorder we have had texture sample chips made to reassure us that the texture pattern not only looks accurate to the original prop, but that it is the correct depth. The depth of the texture varies from 60 mµm to 37 µm depending on its position of the texture with respect to the direction of the mould opening action. Shallower textures are needed on the sides of each part so that it ejects from the mould easily without damaging the surface finish.

The 150 µm deep laser etched texture of the communicator (left) is compared with the 63 µm and 37 µm textures planned for the tricorder (right).

Kydex has a definite grain or direction to the pattern. It’s important to make sure that replica texture is etched into the mould in the correct orientation.
Screw choices
On the outside of the tricorder, the only screws that were visible were three large, polished, slotted panheads. The ones used on the prop were imperial, but for a 24th century bit of kit, we felt that M4 was more appropriate specification and a close enough 21st century match for the screws used on the hero prop. Although hidden from view under normal conditions, two matching slotted panheads are also used to securely fix the strap to the tricorder under the left and right side panels.
When prop building, expedience often dictates the use of glue to fix things in place. For our prop replica, although glue is still viable, or even necessary for certain fixings (such as securing the front panel onto the hood frame), it cannot be used for the majority of the fixings where secure attachment is needed. In keeping with the engineering feel of this piece of equipment, where practical, the rest of the 40 or so other internal screws needed to hold the tricorder together are various sizes of Torx.

Matching the three visible screws, two slotted panhead screws securely attach each end of the strap to the sides of the tricorder.
Display glazing
It’s hard to know exactly what Wah Chang had in mind when he designed the screen for the tricorder. Although there is not enough space in the tricorder hood for the length of cathode-ray tube needed for the display Chang designed in, many fans, Franz Joseph (author of the Star Trek Starfleet Technical Manual) amongst them, imagined the display as a cathode-ray tube. Technical limitations aside, that does make sense, because at the time the dominant display technology was the CRT. But from what this journey has told us about Chang, and the fact that just a year before sketched out the tricorder design, the University of Illinois had demonstrated the world’s first thin and flat plasma screen, he might conceivably imagined something futuristically thinner nestling in the hood, but couldn’t bring himself to ditch the curved screen front which clearly communicated “miniature television monitor” to those 1960s Original Series viewers.

Scan of the hero prop showing screen profile.
Whatever his intention, Wah Chang’s design doesn’t really look like the spherical segment that forms the surface of a CRT – it is too pillowy and as you can see from the scan, slightly flattened at the edges. Our attempt to transform it into the geometry of a CRT showed how far away the original was from a vintage TV tube. The solution was a combination of the two forms. The outline is true to the outline of the hero prop’s bezel, squared up and evened out to give it two-axis symmetry, and the surface curvature is a blend of the Chang display and a CRT.
Detailed design ensures that the glazing is tightly fixed in place, that there is no moisture build-up in the air gap between the curved glazing and the flat face of the TFT LCD, and that the LCD, which has rather vintage proportions and is a tight squeeze in the hood, fits under the glazing neatly and securely without any edges showing.

Render showing CAD model of the original tricorder screen (left), an accurate CRT style screen front (middle), and the final design, blending the hero and the CRT to create a realistic screen front that is in keeping with the original hero prop. The screen is clear, but here shown half covered by mat grey to make it easier to see their form.
With the shape fixed, the material selection was the next crucial step to making a convincing-looking screen. While modern displays have a very flat, almost plastic look to them, tube displays are made of thick glass to withstand the stresses of containing the vacuum that is needed for the cathode-ray gun to work. Our work with different materials, initially for our Twelfth Doctor’s sonic screwdriver display case and then later for our Pip-Boy light-up display screen, showed us that, however polished the mould tool was, the best plastic for giving a truly glass-like effect is Tritan.
Tritan is trade name of a food-grade copolyester made from the incredibly difficult to pronounce copolymerisation of, dimethyl terephthalate, 2,2,4,4-tetramethyl-1,3-cyclobutanediol and 1,4-cyclohexanedimethanol. All we know is that it was developed to look exactly like glass. It’s very clear, glossy, hard and shock resistant, and as a result, is the perfect material for the front glazing of the tricorder’s imitation CRT.

Render showing the final screen geometry, matching the original but with the surface detail of a CRT, in place under the screen bezel.
Watch crowns
The hero prop we scanned has mock indicator lights made from three watch crowns with blue domed gemstones, glued just above the buttons. The watch crowns are perfect for the job. A prop maker loves using found items in their design, especially when they fit the purpose so well. Quick and easy to add, details like these provide an extra level of realistic complexity for very little effort. Chang must have been thrilled to find these little gems, and also used one to add detail to Matt Jefferies’ phaser when he was given the task of refurbishing the phasers a third of the way into the first season.

Vintage watch crowns are gorgeous and a dream come true for 1960s model makers who wanted to add neat little “indicator lights” to their props.
We investigated using modern watch crowns for our tricorder, but the high cost and unreliable source were both issues. Of course, as indicator lights, we need them to light up, and the watch crowns are basically a metal disc with a jewel stuck into a recess in the top surface. Given the level of reengineering needed to make them work for the tricorder, it was simpler to start from scratch and design our own.

Three watch crowns, three different shapes. The scan data and images were used as a guide to create an idealised version – the perfect watch crown.
The watch crowns were clearly sourced from a used parts bin. Worn by years of use winding watches, each one of the originals tells its own unique tale of a lifetime of use: none match. Taking an average of the rounded jewels and the best-surviving areas from each metal part we designed our own version. In our design, the blue “jewel” holds the crown in place, as it snap-fits through the crown and a hole in the main hood front panel.

Blue jewels use snap-fits to securely hold the crowns in place on the hood front panel.
The buttons
The buttons are visually pretty much identical to those of our communicator, as these buttons were also based on the original Aurora slot car wheel hubs. As with the communicator buttons, over the years, much of the electroplating has worn off the tricorder buttons. Our buttons are injection-moulded ABS, electroplated to give the same highly reflective chrome look that the hero prop’s wheel-hub buttons must have once had. Under the two outer buttons are simple tactile press switches, whereas the centre button has a five-way jog switch – these different switch types have different mechanical actions very different actuator shafts, yet they have to appear the same from the outside.
Accurately replicating the hero prop was a primary design constraint, which included keeping the front panel elements correct to our 3D scan data. Since all LCD modules are physically larger than their visible area, this creates a challenge where the display module protrudes slightly over the location of the left button. We overcame this by introducing an additional PCB to hold the buttons, resulting in a stacked PCB assembly.

Cutaway of the hood showing the button PCB and how the buttons are located.
The button PCB gives us the geometric control we need, and is held in exactly the correct position with respect to the front panel by a frame that is screwed to the main PCB. It ensures the correct travel and clearance requirements for the different button styles and eliminates the need for any visible cutaways, features that were clearly not present on the hero tricorder. If you look closely at the hero prop, you can see that although they were glued down, a 0.5 mm high boss on their underside meant that the control knobs were slightly raised off the aluminium surface. Our buttons neatly replicate this raised positioning. To ensure that the buttons are fixed to the switch actuators as securely as possible, hidden under the button flange, the button body extends down through the front panel. This extra length has allowed us to make the buttons with a through-hole in the top, just like the original slot-car hubs and an improvement over our communicator buttons.
And so the conversations regarding design details came and went. Another day, another continent-spanning Zoom call. As the project moved through its various stages it was crucial to make sure that decisions about all the design elements and every detail were thoroughly discussed and agreed on. There are, perhaps, no components or design decisions that don’t have an impact on the design of other parts and thus the integrity of the whole project. Because of the interconnectivity of every minute aspect of the tricorder, the design was iterative, under constant review and decisions that were closed down months earlier often had to be reopened in the light of other important decisions that in turn affected other parts of the design.
Eventually, we will reach a consensus, but in one or two lingering areas, that might not be until the first product rolls off the production line.
Here’s to that day.
LLP
Chris

Coming next time
The hood – Mechanics and construction
Fans who register with us will be the first to read our news and the progress of this exciting Tricorder development and, later, where and when to purchase it. You can catch up with the story so far here on this blog, but if you haven’t already done so, why not register your interest in the Tricorder – you’ll then receive a personalised registration certificate and early access to these updates (before we publish them on our website).
You guys are mad… Beautifully mad.
The attention to detail has to be far and beyond anything I have ever seen, I can’t wait to see the finished product..please, please continue to take your time. This is obviously a labour of love.
On another note, the ROI on both the Phaser and Communicator is impressive. I’ve actually ‘made’ money purchasing those..like lots of $$
Seriously I can’t wait!!! (Obviously I’ll have to as just seen your other update) But so looking forward to getting my pre-order in for this amazing piece of engineering and looking at the functionality you’ve added to it!!
Chris and Richard… take all the time you need to get the Tricorder to market. The attention to detail and the quality really shows through and all of that takes time.
Well Done TWC Team!
As this all comes together, my trust that you need no coaching or input from TPZ members and fans to thinking things down to the microscopic detail of in-universe, and production accurate authenticity. Each new blog post is a delight.
Now that you mention the transport packaging, I can point out that I’ve noticed that the Communicator case and Phaser case interlock, though they have individual designs. Namely, the Comm case’s bottom interlocks with the Phaser case top.
I hope my faith in your OCD dedication will prove out that your Tricorder case/packaging will somehow interlock with the Phaser case, or perhaps (a stretch) both of the prior cases. It would be just too cool a photo op not to try.
Our current plan is not to have a large transit case for the tricorder. Our OCD dedication is being wholly focused on the development of this very complex piece of engineering and the size of the tricorder would make a transit case for it very large and we felt an unnecessary expense for a product that already has its own carry strap. Its stand will however match those of the phaser and the communicator, so there’ll be plenty of photo opportunities if you end up with all three.
Chris, thanks for another mind blowing article! I have been following this project closely and absolutely love everything about it. You guys are checking all the boxes from accuracy to functionality to communication and teasers with these update articles. I have thoroughly enjoyed it.
I’ll admit, when seeing the cardboard box, I was a little saddened to see that the tricorder would not be coming with its own “Starfleet Standard Issue” case like the other two pieces. That extra detail was so well executed and was really integral to the experience and “in-universe feel” of the comm and phaser. It would have been absolutely amazing to have a matching 3-piece set of “Away Team luggage” so to speak. I know I would not bat an eye at any extra expense if it meant having the complete set all come with matching cases. I’d be curious to know how all the other fans feel about this. perhaps a poll? I understand the focus being on the product itself, and you’re doing an amazing job at that. I am happy to hear that the display stands will match, however.
Keep up the good work. You can’t rush art and this is shaping up to be a masterpiece!
Can’t wait to see what TWC comes up with for a travel case. I just hope that it has an Easy Open feature lacking with the previous Landing Party devices. Best. Mike.
Mostly disregard my previous comment. I hadn’t read OTHER previous comments yet. Consider my one vote in the poll to be a “yea” for being willing to pay extra for the travel case. Best. Mike.
Maybe you can offer a case for the tricorder at a later date, as a later optional purchase, so purchaser won’t have to pay the extra/additonsl costs all at once?
Pay for the main item ( Tricorder ) first, then purchase a designed case later?
Just a thought.
I’d really love to have a “luggage” case for the Tricorder, similar to the ones you did for the Communicator and PHASER. These cases ARE awesome and really do have a great, “in-universe” feel/verisimulitude to them.
Any chance at all for a second run of the phaser, for those of us whose first knowledge of TWC was our purchase of the communicator?
We are sorry, but at present, we have no plans to rerelease the phaser. Of course, that position might change in the future, but right now we are concentrating on getting the tricorder ready for manufacture and reissuing the phaser is a major project that we don’t have the time to undertake.
Thanks for this post. I really enjoy your point of view on this topic.
saxenda weight loss injections malaysia